Add a detail provider
IMPORTANT: When adding a new detail provider, it is important that you save any edits on this tab before adding the new provider. This is important because the page can be refreshed after adding the new provider, which results in the system collapsing and then rerunning the summary AQs. If unsaved data exists in a provider block that was previously expanded, the edited data will be lost.
-
Add the new provider in the PROVIDER dimension.
NOTE: They must exist as a valid provider with all required columns completed.

-
In the Bud Admin task pane under Budget Files Administration (or, under Budgets in the Budgeting task pane), double-click Add New Provider Detail Utility.
-
In the Refresh Variables dialog, complete the following:
Option Description Select Existing Provider Select an existing provider to copy from. Select Existing Department Select an existing department to copy from.
NOTE: The provider to copy from can be any existing department because the provider data is coming from the Act_Prov_20XX table, not an existing plan file.
Select New Provider Select the new provider to copy to. Select New Department Select the new department to copy to. -
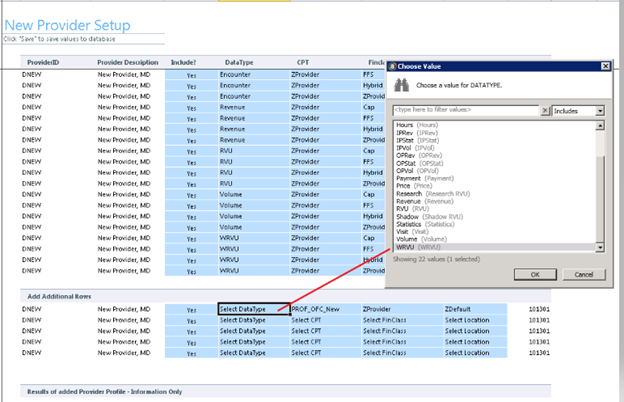
Review the rows assigned to the new provider, and exclude any that you do not want as part of the new provider profile.
In the following example, we do not want the Allowance rows as part of the actual data of the donor provider, but we may not want these for budgeting purposes so we will set these rows to No in the Include column.

-
To add additional rows, use the Add Additional Rows section. In each of the columns for DataType, CPT, FinClass, and Location, double-click the blue input cell to select from a validated list of entries for that column.
-
After updating the new provider’s profile for all desired rows, in the Main ribbon tab, click Save.
The system posts the values to the Act_Prov_20XX table, and uses the database field NYBKHA as the value to post to so no changes to actual imported data are affected.
-
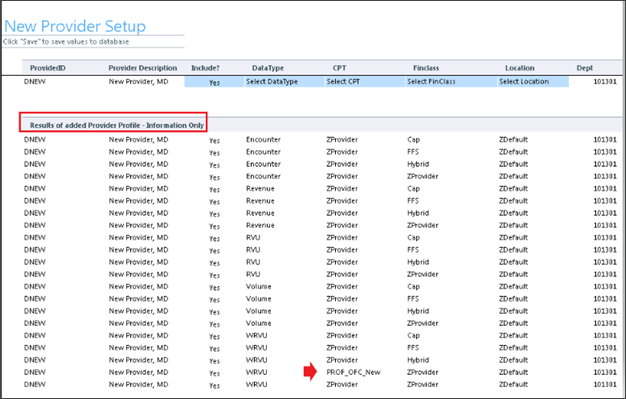
Refresh the utility again to see the final results of the new provider’s profile that will be used in the plan file.
To view log of the activity history, view the Results of added Provider Profile-Information Only section. For example, in a previous step, we added one additional record, as shown in the following example.
-
Launch the plan file, and navigate to the Provider tab.
TIP: You can also use the GoTo navigation and note that the new provider will display there as well. Selecting from this location will navigate directly to the new provider.
-
To immediately add the new provider to the budget plan file, open the budget workbook, and navigate to the ProviderDetail tab.
NOTE: The system will also automatically add any new providers to the budget plan files overnight during processing.
-
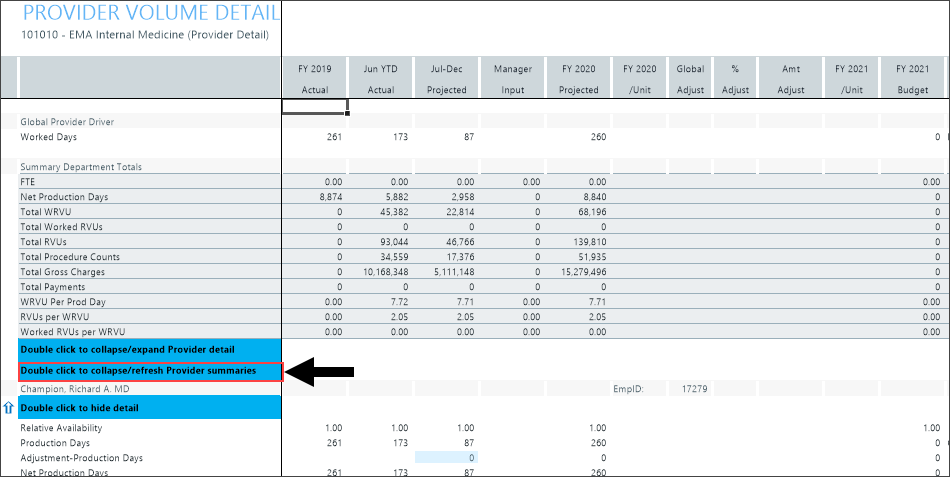
Double-click the Double click to collapse/refresh Provider summaries cell to refresh the page.
NOTE: This action first collapses the existing list of provider details. Complete the next step to refresh the list of providers.
-
Again, double-click the Double click to collapse/refresh Provider summaries cell to refresh the list of providers.
NOTE: The providers will appear in the collapsed mode.

- After making any changes, click Save.
